First off, I shall start off with a bit of research I happened to stumble across and that ever since WW2 all Brtish Tanks have tea making facilities in them. Why?
There was a survey conducted on 'Casualties Amoungst Armored Units in Northwest Europe" by the British Medical Research Council found that around 37% of all accidents were caused being outside of their tanks. Also, there was an incident where the British were taken by surprised by the German's because the British tank crews were brewing a cupper. So British tanks were then on made to have tea making facilities inside.
Research links:
The British Perfected the Art of Brewing Tea Inside an Armored Vehicle
Tanks for the Tea
Anyway, back to the Spitfire model:
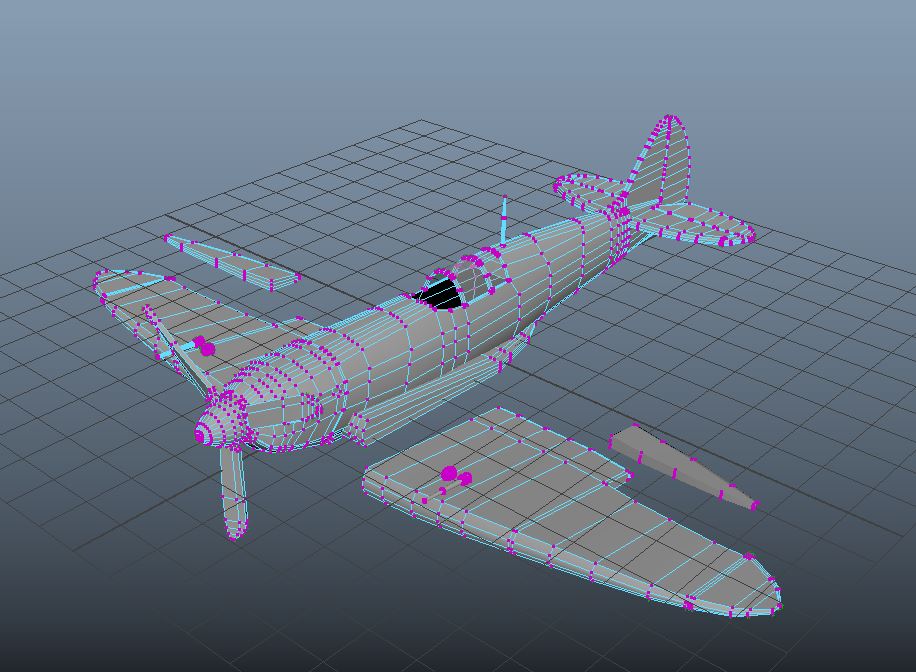
As stated in last weeks post, I sorted out the low poly model and UV mapped the Spitfire (minus some Maya crashes during the week).
I also sorted the low poly model for the cockpit and have mapped the UV's, but I haven't sorted them out on the UV set yet. That will be next weeks task or I may just begin to bake to outer sections and begin to texture - As UV unwrapping is the only part of 3D modeling I'm not fond of, so I may just take a break from it for a week.
Also, to take a break from UV mapping, I fully textured the Fallout 3 10mm pistol in Painter to do some texture practice:
Note: I gave myself two days at most to do this
Saturday, 23 June 2018
Saturday, 16 June 2018
High poly modeling
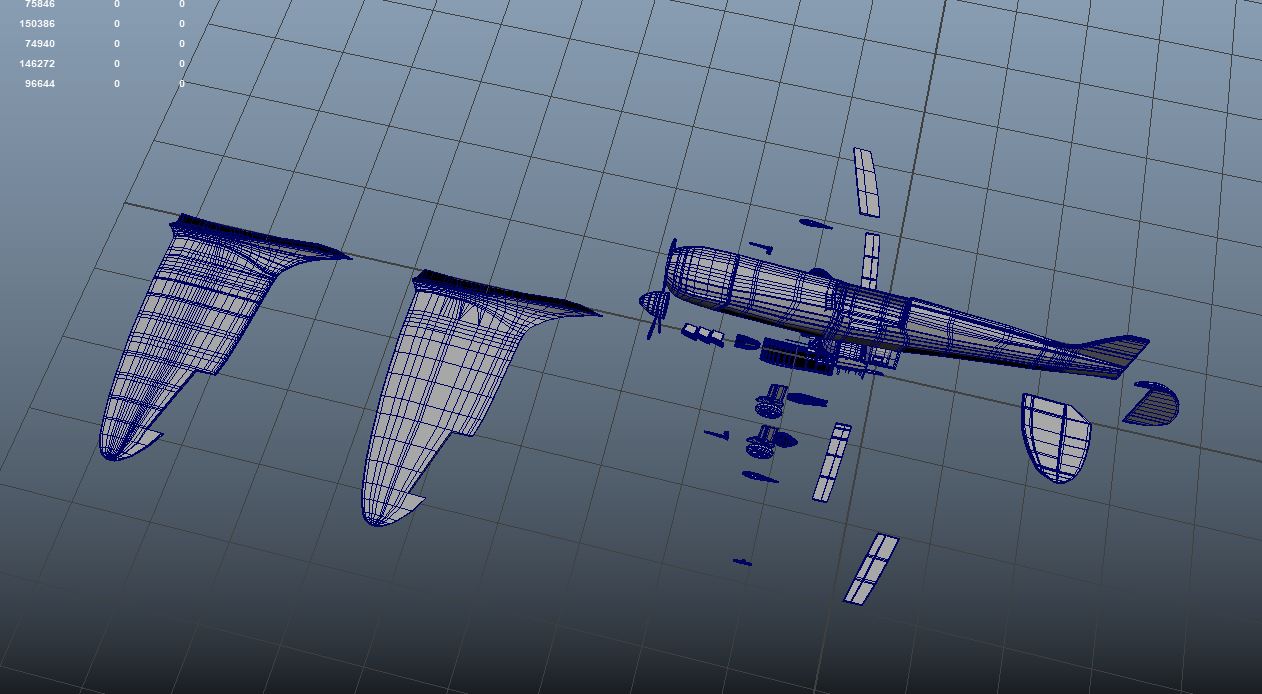
This week I have redone the wings. I also did the high poly version of the outer sections for the Spitfire. I think I'll do the panels in Zbrush and bake them onto it or failing that, I shall paint them in Substance Painter later. Also this week, I ended up modeling the cockpit for the Spitfire - this took up most of the week.
Whilst trying to find references for the cockpit, I couldn't find any good reference pictures. However, I did find something better. I found two 360 views of a Spitfire cockpit (unfortunately they aren't the right mark but it'll do for reference)
Spitfire Mark IX Cockpit Interactive Panorama
National Museum of the US Air Force - Cockpit 360 images - Supermarine Spitfire MK. VC
I also couldn't find any good refs for the Spitfire cockpit chair, so I did have to look at some models (i.e. Airfix models) for reference:
Spitfire Mk. I/II & Mk. V Super Detailed Cockpit Sets
Tamiya's 1/48 scale Supermarine Spitfire Mk.Ia by Werner Scheibling
Whilst trying to find references for the cockpit, I couldn't find any good reference pictures. However, I did find something better. I found two 360 views of a Spitfire cockpit (unfortunately they aren't the right mark but it'll do for reference)
Spitfire Mark IX Cockpit Interactive Panorama
National Museum of the US Air Force - Cockpit 360 images - Supermarine Spitfire MK. VC
I also couldn't find any good refs for the Spitfire cockpit chair, so I did have to look at some models (i.e. Airfix models) for reference:
Spitfire Mk. I/II & Mk. V Super Detailed Cockpit Sets
Tamiya's 1/48 scale Supermarine Spitfire Mk.Ia by Werner Scheibling
Next week: Clean up the low poly model and start unwrapping
Saturday, 9 June 2018
Modeling
This week I haven't been feeling too well and feeling low, so I'm keeping my head down and work. I'm not going to write much this week. I'm going to post screenshots of the progress I made during the week. Each day will have a screenshot(s) from the morning as I start and the second will be a screenshot before I finish for the day.
Note: The first screenshot of the 4th is where I finished off from last week after faffing around (and restarting it) for two and half days trying to sort out the main body and making sure that it looks right. I did end up moving single edges to try and get the form right.
Note: I also decided instead of modeling one side and then the other, I decided to model one side then mirror it - as it saves way more time and makes sure it's the same
Note: The first screenshot of the 4th is where I finished off from last week after faffing around (and restarting it) for two and half days trying to sort out the main body and making sure that it looks right. I did end up moving single edges to try and get the form right.
Note: I also decided instead of modeling one side and then the other, I decided to model one side then mirror it - as it saves way more time and makes sure it's the same
Monday 4th June:
Morning
Afternoon
Note: As you can see, I made the outer wings and the wing sections that connect to the main wings and the body separate - This will give me more control with the shape. Learning from my mistakes from the first model and learning from analyzing the other artist models.
Tuesday 5th June
Morning
Afternoon
Wednesday 6th June
Morning
Afternoon
I'm not happy with the wings. I've added too much geometry (which is far from clean) thus made it extremely hard to edit and change the shape. I'm gonna restart it as the wings are way too thick for a Spitfire. Tomorrow I'm gonna keep it clean and simple, get the right form then edit to the right shape and the way it needs to look like.
Thursday 7th June
Note: I got really huffy with the front side of the wings yesterday, so I restarted it. Also I only just done screenshots from the afternoon as I only worked on the wings. I used a cube and added a lot of edge loops and then moved the edges to the round shape. I finished editing the section connecting the wings to the body. I've now connected them to make sure all of it flows right.
Friday 8th June
Saturday 9th June
Today I took a break from the Spitfire and created a turntable for the Spitfire as ideally, I want to have a turntable video for the show. I created, baked and textured within a day.
Sunday 10th July
I think I may edit or even redo the wings for the Spitfire. I took a render in Substance Designer (with the turntable as I wanted to test the turntable stand) and I wasn't happy with the form
Test render:
As seen illustrated below with the red lines, this is roughly how it should go. I'm gonna spend today trying to edit this section.
Sunday, 3 June 2018
Research
Note: I'm going to spread this week's blog post across two posts.
Though I want to get onto the modeling as soon as possible, as I want to get the Spitfire asset done for the week of 16th July, I wanted to get some research done.
But as always, I start off the project with some mood boards.
In addition to all of this, I watched a few documentaries about the Spitfire, Battle of Britain, the female spitfire pilots and one other that could be helpful for this project:
Spitfire: Birth Of A Legend (Fighter Plane Documentary) | Timeline
BBC Documentary 2017 - The British Spitfire - Military Documentary
The Battle Of Britain (Military History Documentary) | Timeline
13 Hours That Saved Britain (Battle of Britain Documentary) | Timeline
SPITFIRE
The Second World War: Fighters of WWII
Spitfire Sisters
Nancy Wake: Gestapo's Most Wanted (French Resistance Documentary) | Timeline
I've also been looking at BBC's WW2 People's War Archive. I'm not going to say much as I rather the stories speak for themselves, but I'm going to leave direct links to some of the stories.
DOODLEBUG
My Mum's War: Life in the East End
Radio & TV Trade; and Evacuation from Slough
Ginger Thomas's D-Day: Working for Cossac
An Air Raid Incident from World War Two
In the Land Army and ATS
A Day in the Life of a Secret Agent
The Ex-WAAF and Hitlers Chef
Building a Radio a P.O.W. Camp - Part One
I helped with the Dambusters raid
Help Spitfire
The New Boy: Joining 66 Squadron, RAF
Spitfire Pilot
Frank Walker-Smith: Battle of Britain Hero
Memories of a Squadron Leader in the Battle Of Britain
The Battle of Britain from the Ground
“WW2 People's War is an online archive of wartime memories contributed by members of the public and gathered by the BBC. The archive can be found at bbc.co.uk/ww2peopleswar”
Though I want to get onto the modeling as soon as possible, as I want to get the Spitfire asset done for the week of 16th July, I wanted to get some research done.
But as always, I start off the project with some mood boards.
Whilst researching, I decided to base the Spitfire model on the Mk II version of the Spitfire, as both Mk I and Mk II during the Battle of Britain.
Furthermore, whilst researching, I found out that both Mk I and Mk II had problems with the Merlin engines. Why is this? The earlier models of the Spitfire, the Merlin engine would stall if the Spitfire make any maneuver with high negative g levels (such as going upside down) the fuel would flood the engine and thus stall the engine and won't work properly.
The German Messerschmitt didn't have this problem (as much) as it used an injection engine. Unless pushed to the extremes, the Messerschmitt could function normally.
The Spitfire's however, used carburetors - which was a standard for the time. Whilst the injection engines were new.
Some research links:
Norwich Gaming Festival
This year, I volunteered at the Norwich Gaming Festival (NGF). I was hoping to send one day demoing texturing and another demoing photogrammetry. But I decided to choose to do photogrammetry (at least retopo of the model I created with photogrammetry).
So for the demo, I decided to the retopologizes the model I created for photogrammetry using quad draw. It did take me a while to do, so I'm glad I decided to use both days to demo this.
High poly vs low
Granted, the topology could be way better. I am very happy with how it turned out and really want to work with photogrammetry more in the future. As much as I would have loved to finish this off, I couldn't spend too long on this.
In addition to all of this, I watched a few documentaries about the Spitfire, Battle of Britain, the female spitfire pilots and one other that could be helpful for this project:
Spitfire: Birth Of A Legend (Fighter Plane Documentary) | Timeline
BBC Documentary 2017 - The British Spitfire - Military Documentary
The Battle Of Britain (Military History Documentary) | Timeline
13 Hours That Saved Britain (Battle of Britain Documentary) | Timeline
SPITFIRE
The Second World War: Fighters of WWII
Spitfire Sisters
Nancy Wake: Gestapo's Most Wanted (French Resistance Documentary) | Timeline
I've also been looking at BBC's WW2 People's War Archive. I'm not going to say much as I rather the stories speak for themselves, but I'm going to leave direct links to some of the stories.
DOODLEBUG
My Mum's War: Life in the East End
Radio & TV Trade; and Evacuation from Slough
Ginger Thomas's D-Day: Working for Cossac
An Air Raid Incident from World War Two
In the Land Army and ATS
A Day in the Life of a Secret Agent
The Ex-WAAF and Hitlers Chef
Building a Radio a P.O.W. Camp - Part One
I helped with the Dambusters raid
Help Spitfire
The New Boy: Joining 66 Squadron, RAF
Spitfire Pilot
Frank Walker-Smith: Battle of Britain Hero
Memories of a Squadron Leader in the Battle Of Britain
The Battle of Britain from the Ground
“WW2 People's War is an online archive of wartime memories contributed by members of the public and gathered by the BBC. The archive can be found at bbc.co.uk/ww2peopleswar”
Saturday, 2 June 2018
Analyzing, planning and the beginning
Note: As mention on the other blog post for this week, I spread this week's blog post across two blog posts.
To differentiate from the Spitfire model, I wanted to plan out (albeit rough) and also, I thought it was best to look at other artists 3D models on Spitfires or other artist tutorials to see how they approach modeling a Spitfire.
I really want to improve from the first Spitfire model and not to make the same mistakes again. So as an exercise, I found models and analyze them and pulled them to part to see how they were formed. It's art 101 to analyze another artist work (traditionally anyway) and to learn from it. Why not with games?
Art & Design Analysing an artist's work - what I looked at back when I did GCSE art - It has probably updated since I finished my GCSE's 8 years ago. But fundamentally it's the same.
Also, I looked at this article a while back that gave me the idea to look at other people's models and see what I can learn from them and what I should and should not do when it comes to my own model: How to Be Inspired by Other Artists Without Copying Them.
This tutorial I found, though it did help my understanding, it wasn't the best of tutorials. However, it did give me great reference images to use whilst I create my Spitfire. I didn't watch all of this series, but enough to get an understanding of the form of the Spitfire
Maya 2013 intermediate modeling - Spitfire - 1 - Set up
Models I analyzed:
UK WW 2 Spitfire MK 1 3d model
DIVISION 303
The First One:
One thing I noticed with this model is that every single section has its own UV set (cockpit, propellers, glass, pilot, left wing, right wing, main body, back part of the body and some other sections). I understand the pilot would definitely need its own UV set, but I don't think everything else needs several UV sets. Maybe one, or even two at most?
Note: I think it would be best if I put cockpit and the outer sections of the Spitfire on separate UV maps. Outer sections on a 4k map and the cockpit on a 2k map. Beforehand I laid out all of the Uvs on one 2k map. The textures would probably be so blurry.
Also, one thing I noticed about both models that the wings are attached to the main section and are separated. Perhaps I should do the same? To overcome the problem with the wing connecting to the main section, would this help?
Another thing I noticed is that the rear section and main section is separated. I'm not sure if I'm being an idiot, but I don't understand why they may have done this. Obviously, the flappy bits and rudder would need to be separated due to animation. But why the other bits separated? I think this might just come down to the artist's preference.
But overall, it's accurate to what a Spitfire looks like.
The Second One:
I think this model is more for animation than for games. However, the one thing that stands out to me is bolts are actual geometry. After a certain size, yeah it would need geometry but for this size, I think it would be wasted geometry that could be used somewhere else and should be normal mapped in. Also, a similar thing could be said about the panels at the front. They could be a high poly and baked onto a lower poly model. On both, the overall form is really good (especially compared to my original Spitfire model)
Also, one thing I did notice with both of these (minus both having pilot assets) they both don't have cockpits modeled in. Maybe for my asset, I should have a cockpit in.
Another thing I noticed is the section between the wing and the main body (the most problematic bit in my original Spitfire model) isn't connected. I think I may do this for my Spitfire model so I have more control over it.
In addition to looking at these, I notice sections I didn't really pick up on in the first Spitfire model or looking at references for the one I'm going to make for this project and that a flappy bit under wings (not the obvious main one you can see). Looking at these give me a new perspective of what I need to do. Also, both have the wire thing from the back rudder to the pole just begin the cockpit - may need to include this.
Also, probably me being an idiot. But, with this asset, I know games can cope with way more polygons but I'm not entirely sure. This is roughly 156k tris. I understand that games like the latest Final Fantasy have 100k polys for main characters but they would be the main focus and have the most screen time. I know the prime factor for poly count would depend on platform i.e. computer, console or mobile. I'm probably being an idiot, but for animation, it would be great, but in terms of a game maybe not. Probably wrong about this. But something to think about.
Out of these two, this is the most accurate Spitfire model - I know I won't be able to create something as good as this, but I did learn what I need to do to improve on.
Also made a sketch with the Spitfire with added notes of its dimensions (length and height etc.)
Unlike the original model, I used a cylinder and as indicated by the red arrow, I extruded a section up to get the back end right.
To differentiate from the Spitfire model, I wanted to plan out (albeit rough) and also, I thought it was best to look at other artists 3D models on Spitfires or other artist tutorials to see how they approach modeling a Spitfire.
I really want to improve from the first Spitfire model and not to make the same mistakes again. So as an exercise, I found models and analyze them and pulled them to part to see how they were formed. It's art 101 to analyze another artist work (traditionally anyway) and to learn from it. Why not with games?
Art & Design Analysing an artist's work - what I looked at back when I did GCSE art - It has probably updated since I finished my GCSE's 8 years ago. But fundamentally it's the same.
Also, I looked at this article a while back that gave me the idea to look at other people's models and see what I can learn from them and what I should and should not do when it comes to my own model: How to Be Inspired by Other Artists Without Copying Them.
This tutorial I found, though it did help my understanding, it wasn't the best of tutorials. However, it did give me great reference images to use whilst I create my Spitfire. I didn't watch all of this series, but enough to get an understanding of the form of the Spitfire
Maya 2013 intermediate modeling - Spitfire - 1 - Set up
Models I analyzed:
UK WW 2 Spitfire MK 1 3d model
DIVISION 303
The First One:
One thing I noticed with this model is that every single section has its own UV set (cockpit, propellers, glass, pilot, left wing, right wing, main body, back part of the body and some other sections). I understand the pilot would definitely need its own UV set, but I don't think everything else needs several UV sets. Maybe one, or even two at most?
Note: I think it would be best if I put cockpit and the outer sections of the Spitfire on separate UV maps. Outer sections on a 4k map and the cockpit on a 2k map. Beforehand I laid out all of the Uvs on one 2k map. The textures would probably be so blurry.
Also, one thing I noticed about both models that the wings are attached to the main section and are separated. Perhaps I should do the same? To overcome the problem with the wing connecting to the main section, would this help?
Another thing I noticed is that the rear section and main section is separated. I'm not sure if I'm being an idiot, but I don't understand why they may have done this. Obviously, the flappy bits and rudder would need to be separated due to animation. But why the other bits separated? I think this might just come down to the artist's preference.
But overall, it's accurate to what a Spitfire looks like.
I think this model is more for animation than for games. However, the one thing that stands out to me is bolts are actual geometry. After a certain size, yeah it would need geometry but for this size, I think it would be wasted geometry that could be used somewhere else and should be normal mapped in. Also, a similar thing could be said about the panels at the front. They could be a high poly and baked onto a lower poly model. On both, the overall form is really good (especially compared to my original Spitfire model)
Also, one thing I did notice with both of these (minus both having pilot assets) they both don't have cockpits modeled in. Maybe for my asset, I should have a cockpit in.
Another thing I noticed is the section between the wing and the main body (the most problematic bit in my original Spitfire model) isn't connected. I think I may do this for my Spitfire model so I have more control over it.
In addition to looking at these, I notice sections I didn't really pick up on in the first Spitfire model or looking at references for the one I'm going to make for this project and that a flappy bit under wings (not the obvious main one you can see). Looking at these give me a new perspective of what I need to do. Also, both have the wire thing from the back rudder to the pole just begin the cockpit - may need to include this.
Also, probably me being an idiot. But, with this asset, I know games can cope with way more polygons but I'm not entirely sure. This is roughly 156k tris. I understand that games like the latest Final Fantasy have 100k polys for main characters but they would be the main focus and have the most screen time. I know the prime factor for poly count would depend on platform i.e. computer, console or mobile. I'm probably being an idiot, but for animation, it would be great, but in terms of a game maybe not. Probably wrong about this. But something to think about.
Out of these two, this is the most accurate Spitfire model - I know I won't be able to create something as good as this, but I did learn what I need to do to improve on.
As well as looking at these, I've found some on Sketchfab. Several are for a texture challenge, but I wanted to see how they approach texturing a Spitfire and to see how they went around presenting their work. Here are my favorite ones:
Spitfire texture challenge:
I love the movement on this one and the way it's presented. Also, look in the cockpit, there's a particular cartoon character inside it (I will admit, this made me chuckle).
I love the wear effect on this one.
This one has a lot of narrative in it, there's action and I love the flow and the way the fire reflects on the water. If the project lasted longer, I would love to do something similar to this! The presentational style is so good.
Out of all the Spitfire's I looked at, this one is my favorite. I know I have done stylized cel-shaded (albeit not very well) before but this looks amazing. Though I really want my project to look realistic, this is really cool.
Other ones found on Sketchfab:
Looking at this one, I'm not sure if it's meant to be stylized but the main thing that I keep looking at is that the wings are too thick for a Spitfire (Spitfire wings are very thin). The wear on the cockpit section is good but the entire thing looks a tad squished for a Spitfire. Also, the geometry looks very clean when I was looking at it.
Similar to the one above, the Spitfire looks very squished - Not sure if it's meant to be stylized again. Unlike the other ones, this has a cockpit inside it, though all normal mapped in.
Note: Though I won't do LODs for the Spitfire during this project. Looking at this gave me an idea that if I ever do LODs for the Spitfire I want to create for this project, for the LOD furthest away, I think I will back down the cockpit into textures (no need to have a fully modeled cockpit if you're looking at the Spitfire far away. Unlike the last one, the wings on this aren't too thick but still slightly too thick for the Spitfire (at least for the size of this Spitfire). Unlike the others, the stuff that probably should be on the normal maps are i.e. bolts and panels.
But one thing I noticed for this asset is that it's only 18k tris. I know I was saying one of the Spitfires above might have too many tris, but this (for a AAA console or PC game) it's very low poly. I need to aim above 20k tris for my Spitfire asset.
The form for this one looks spot on and the geometry looks good to a point (minus the back wing section, there's no bevel and has a very sharp single edge.
A common thing I notice with most of these Spitfires that the wings aren't connected to the main body. Also, the same problem as the one above, this Spitfire asset is only 16.1k tris - once again, not sure if it's meant to be stylized but this seems way too low.
Once again, I need to aim above 20k tris for my Spitfire asset I want to create for this project.
Overal, this was a very handy exercise. As I got an idea how I should lay out the topology, pay attention to the form (and certainly not start out with a cube primitive), the way I want the UV sets to be (one for the outer section and another for the cockpit). Also, it's made me way more picky with my model and not settle for less. It's made me want to push my modeling skills more.
My Gameplan:
After looking at these, I created a (very) simple sketch to break down the Spitfire into sections for modeling.
Also made a sketch with the Spitfire with added notes of its dimensions (length and height etc.)
As previously stated, after looking at the tutorial, though I didn't find it as helpful, I did, however, found the ref images from the tutorial helpful - As can be seen below:
As stated above, the exercise has made me pickier the way I model, to be more critical and not settle for less. I'm not happy with how the main section I created looks, I know it's only the start but I'm really not happy with the form. It's probably gonna take me a while to sort out the main section of the body.......
Note: To actually make the reflective journal/blog more legible and grammatically correct, I was suggested to use Grammarly. So far, it's helping, think I'll use it for the rest of the blog posts. Instead of the posts looking like a monkey have written them.
Also this week, I got some book out from the main library in Norwich that could help with this project.
Also, to help me keep on track, I've made a tracking sheet in Excel. This will help me with what I need to do, what I've complted, what I still need to do, if I'm ahead or behind on a task etc.
Thursday, 24 May 2018
Master Unit - The last MA unit
Today is the day where I start my last unit for my master's degree and what will I do for this unit? Good question. I will be recreating a Spitfire - not sure which one model yet but I shall do research tomorrow evening on what the different marks of a Spitfire.
Why am I choosing a Spitfire? Firstly, they are amazingly beautiful plans and amazing pieces of engineering but there's also a personal connection. Unfortunately, my Granddad (the person who I was named after) died when I was young, but he always liked his planes; always go to air shows; own a bunch of books and memorabilia for plans and the RAF and the history of the RAF. To me, this unit is a way of connecting with my Granddad.
This one of the reasons why I have always loved games and why they are an amazing art form - not only are they this (point above) for the artist but for the player too. Even though they may not be artists, the players can still partake in the journey of this art form. Though they didn't create the game, it's up to the player how they traverse this piece of art or how they interact with it. Games are art and the biggest purpose of the game is to be played - a game is not a game if it doesn't get played - it doesn't fulfill its artistic purpose. For example, for RPG's it's up to the player what happens within the game and how this final stage of this art form ends (This also creates Meaningful Play). They too can use this art form as an extension of themselves - to show their soul and help express emotions they may not be able too anyway else (this feed into my RIPU project on how games can help mental health issues such as depression and anxiety)
Theoretical bit aside:
As apart of my research, I got a Revell model kit of a Spitfire Mk Vb. This research has basically given me a great excuse to make models again and relive childhood memories (though I will admit I am a tad bit out of practice as this hasn't turned out too well) This has given me more of an understanding of how the Spitfire looks. This has also given me a great first-hand reference.
At the end of year one of my Games Art & Design degree, I did attempt to create a Spitfire - however this was long before I knew how to bake textures; to go high poly models; exporting objects in to Zbrush from Maya to add more detail to the high poly model; use Substance Painter and Designer for textures; how to lay out UV's properly and PBR - basically a lot of things I didn't know what I know now. So this project will be interesting to see how much my work has changed/show how I've improved since then. Or how I leveled up since then. Once I finish the Spitfire for this project, I will show a comparison between the end of year one Spitfire and MA spitfire

Also, during the week I held a workshop for a lesson I was covering at a college. I was teaching them texturing, modeling and baking.
I got them to use xnormals for the baking and taught them the different maps for PBR (albedo, roughness, and metal for example). I used Photoshop on how to do the PBR maps and showed them how to unwrap models in 3Ds Max and how to export the UVs into Photoshop.
The month I was at Paston, I was helping students with their modeling (such as to work in quads, how to bake, UV unwrap, don't leave unconnected verts randomly placed around the model etc.) and explaining PBR
High and low poly renders are rendered in one of the renderers in Maya. The normal mapped one is just the standard viewport screenshot.
Note: I couldn't grab the screenshots in 3Ds Max whilst I was teaching, so I grabbed screenshots in Maya when I got back home.
Before I went head first into modeling the Spitfire, I wanted to do a quick painting on how I wanted the final to eventually look like.
Also, I needed a break from research, I did a super quick painting study based on Papa Emeritus from the band Ghost. I limited myself to two hours for this as I know I would spend way too much time on this to complete it. So this is how far I got on it:
Note: Due to the very short time frame (We've been told to aim to get creative work finished by the week of 16th July) I'm going to be really strict with my work schedule. I am aiming to get most of the modeling done within a week, high poly for one week, Uv mapping and baking for one week and texturing and shorting out what I need to do for the rest of the weeks leading up to the 16th.
Also, I'm not going to create textures in Designer and gonna use either textures I've already created in my last units combined with texturing in Painter and use the smart masks for texturing the Spitfire asset. I don't think I'll create the high enough quality textures for the Spitfire. But I will try my best to create graphics for the Spitfire.
Subscribe to:
Posts (Atom)