Thursday, 21 May 2015

Haroun and The Sea of Stories

For cs in BA3, we have been tasked with a group partner to: Design two characters Haround and The Sea of stories and design them in one of three styles. To which we also must integrate character theory and shape theory into our designs. In-addition to these characters, we must present a playboard (like a story board, but show how a game would work, this concept is coined by NUA)

My group partner and I decided to go with the styles of Graphic Novel, Pixel and Minimalism, we also decided to choose Blabbermouth and the Snooty Buttoo from the book.

At the end of this project, we must present this as a presentation in ten minutes


Here's a selection of slide for the presentation


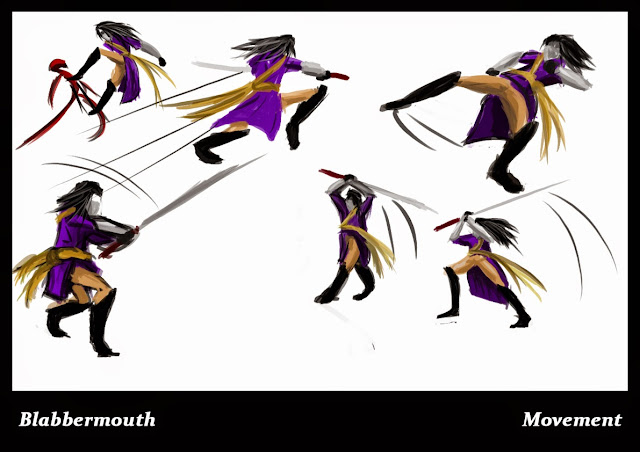
 For the slide above, I looked at Kendo and Muay for movement of Blabbermouth.

Both my group partner and I collaborated on the moodboards, we looked at styles that can influence Blabbermouth and the styles we chose for this project.


This is a mind map exploring game mechanics for the playboards


Both my group partner and I both collaborated on iterations for Blabbermouth, to which I used my group partner's iterations to inspire my further iterations


My group partner focused on Snooty Buttoo whilst I was progressing on the Blabbermouth iterations 


These next two slide are ruff playboard ideas


Snooty Buttoo in three different styles


Blabbermouth in three different styles


This slides is to show Blabbermouth's movements


Playboard 


BA3 - Evaluation

It's evaluation time again. Where do I begin? At the beginning of this project with I was very daunted by this project; especially at the thought of using Maya. However, my opinion has defiantly change, I love using Maya, more so than Zbrush.

I have defiantly learnt a lot during this project like: how to do uv mapping; why to use normal maps and how to create them; how to do texture for a 3D model properly; how to make a mesh somewhat sufficient; that ngons are bad etc.

If I had more time or had a chance to do this project again, I think I might change the roof on my folly, as looking back it's could defiantly be better (as to me it look kinda flat). Also, I think I could easily made my folly interesting, as I think my design is quite basic. But given this is my first time properly using Maya, I don't mind the simplicity of it; as the saying goes "learn to walk, before you run". Other than that, I am pleased how my project has turned out.

Where to improve:
I really need to remember to set a project before I start modelling on Maya; time management I always need to improve on; I am defiantly going to try and improve my modeling skills, as I want to get really good at Maya. Lastly I want to learn how to make my meshes more efficient.

The finished product!


After many hours of work, blood, sweat, tears... and energy drinks, my folly is completed! 

I am very pleased on how this has turned out, especially given this is my first time properly using Maya.


Specular, Defuse and Normal map


My specular, defuse and normal maps for my folly:


Folly building process

Though a tad tedious at times, I quite enjoyed the building process of my folly. I am really enjoying Maya now. Here's some screen shots of the building process of my folly: 


I manage to create the base of my folly quite easily, though I did encounter some problems whilst trying to deform the tower to make it look decrepit. 


This was the original window I was going to use for my folly, however, I encountered many problems with the window, and decided to go for another style of window.


This was the original design for the folly, however it was full of ngons, bad typology, a pain to texture and I wasn't pleased how the crack looked on the side. So I decided to go back a couple of save (I got into a habit when every time a manger change happen to the model, I would save it as another file. Handy too just in case a file corrupts,  you could go back to another save, without losing to much work)


Instead of taking a massing chunk out of the side of the tower, I decided to extrude a face inwards, and I also used the lattice deformer function in Maya to make the tower look like it's falling on the side due to the gravity.

Lattice deformer in use


Results from lattice deformer


This is the other window I created and chose for my model. This version was better than the other one, and wasn't as much as a pain to uv


 After I was settled on how my folly looked and cleaned the mesh up I proceeded to uv map it


This image below is when I applied ambient occlusion to the model


Textured window and fully textured tower with UV map


Mood boards and Ideas for folly


Folly mood board


My original idea for my folly, I wanted to create a clock tower, however having a clock on the folly will give the folly a practical purpose, and by definition as folly doesn't have a practical purpose. I decided to go for a tower instead.


In-addition to my mood boards, I done some 2D itterations for my folly. One of my other original ideas was to have a ruined wall with a window in it. However, the clock tower, then eventually tower idea stuck to me.


 Tower mood board


BA3 The official brief

After completing the studies, we've been given our official brief for BA3. We have been tasked to create a folly in Maya.

What is a folly?
The definition of a folly is a ornamental building with no practical purpose. They commonly look like towers mock-Gothic buildings or ruins. They are mainly there to serve as a conversation piece. They are commonly found in gardens or parks


Texture Photos

For my studies, I went out and around Norwich to take photographs of walls, floors and anything I could use as a texture for my models.

Note: It's best to take texture photographs on days when the weather is overcast, as the sun wont create shadows which can be a pain to sort out during texturing


Textures


After I uv  mapped by chimney (which took a very long while), I began the process of texturing.
Firstly, I started with the diffuse map


Before I got any texture down on my model, I put a base texture to work off. For the bricks I used a photograph that I took myself, for the slate I used a texture base image of CG Textures. (with the base textures down, I used it to create a specular map and normal map)

After the base image was down, I proceeded to add detail to the model


These are the normal map (I used CrazyBump to create the normal and spec map)


Normal map

Defuse map

Specular map


Once I got these done I was able to apply these to my model